
Eloqua Blog · Advanced
Making GA Data Usable in Eloqua
Part four of my Eloqua and Google Analytics series. In this article I show you how to store Google Analytics UTM data correctly inside Eloqua using Custom Objects, so you can run reliable attribution and reporting across campaigns.
📅 First published: 20 May 2019 · Updated and rewritten
⏱ ⚙ Complexity: Intermediate • 👥 Audience: Marketing Ops, Eloqua Admins, Web Analytics • 🎯 Focus: Storing UTM data for attribution
Part 4 - Making Google Analytics data usable inside Eloqua
Welcome to part four of my guide to integrating Google Analytics with Eloqua. If you have not read the earlier parts, I strongly suggest starting from the beginning so each step builds on a solid foundation.
You can find the full series starting here: Google Analytics tracking on Eloqua forms .
By this point your campaigns are fully integrated with Google Analytics and your landing pages are capturing UTM parameters into Eloqua forms. Now we need to take the final step and store that data inside Eloqua in a way that is robust, scalable and actually useful.
Where we are in the series
- Part 1: Designing your Google Analytics UTM structure
- Part 2: Automatically tagging Eloqua emails
- Part 3: Passing GA data through Eloqua forms
- Part 4: Making GA data usable in Eloqua (this page)
Why storing GA data correctly inside Eloqua matters
Right now you can probably see all of your UTM values by opening a form, clicking Settings and viewing Submission Data. That is fine for debugging but it is useless for serious analytics.
You should not be exporting CSV files every time someone asks which campaigns drove pipeline last quarter. You have a powerful automation and data platform at your fingertips. It is time to let Eloqua do the heavy lifting.
To make Google Analytics data truly useful inside Eloqua you need to:
- store every campaign touch against the contact
- preserve history rather than overwrite values
- support multi touch and first touch attribution models
- make the data easy to consume for reporting and CRM
Eloqua gives you two possible places to store this data:
- the Contact Record
- a Custom Object
Option 1 - Storing UTM parameters on the contact record
On paper this looks tempting. You simply create five new contact fields for:
- utm_source
- utm_medium
- utm_campaign
- utm_content
- utm_term
You then map your form fields into those contact fields. Reporting becomes straightforward. You can pull the UTM values straight into a contact view alongside lead score, region and CRM data.
Unfortunately this approach breaks as soon as a contact engages with more than one campaign.
Consider a simple scenario:
- In January a contact responds to Campaign A and sales closes a deal.
- In February the same contact downloads a whitepaper from Campaign B and does not buy anything.
If you store UTM values directly on the contact record then Campaign B overwrites Campaign A. Any revenue reporting that joins by contact will now artificially attribute the sale to the wrong campaign.
You have lost all historical context and your attribution is broken.
Option 2 - Storing GA data on a Custom Object
This is where Custom Objects come in. Eloqua might call them Data Cards, Custom Data Objects or CDOs. In practice they are all the same thing. I will refer to them as Custom Objects for simplicity.
A Custom Object is a separate table of records that links back to the contact. One contact can have many Custom Object records. That is exactly what we need for campaign tracking.
At a base level I explain it like this to clients:
Imagine you are hosting a client dinner and you need to collect their menu choice and dietary requirements. Would you really want this stored directly on the contact record?
The answer is no. The contact may attend multiple events and will pick something different each time. So you attach those responses as separate records.
The same applies to campaigns. A contact might respond to ten campaigns over two years. You need ten separate records, not one field that keeps getting overwritten.
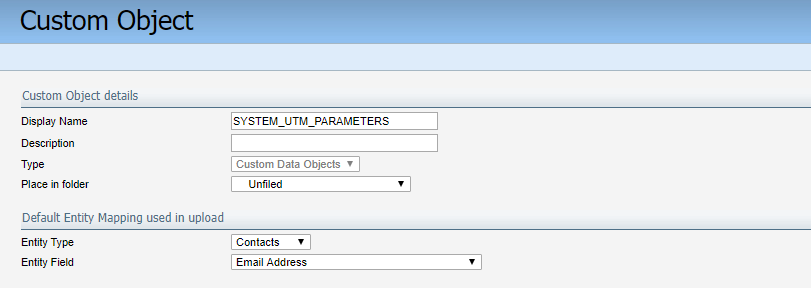
Step 1 - Create the Google Analytics Custom Object
In Eloqua go to:
Audience → Custom Objects → New Custom Object
Give it a clear descriptive name, for example:
- Google Analytics Data
- GA Attribution Log
Step 2 - Add UTM fields and Email Address
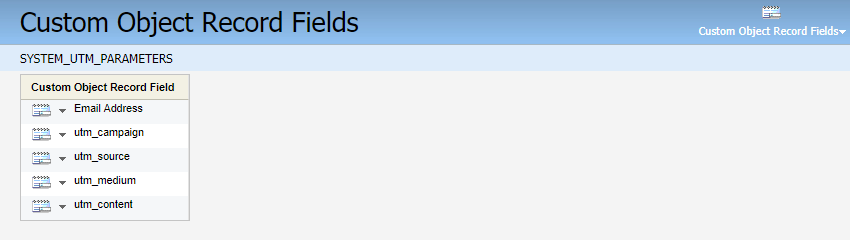
Next you need to add the fields that will hold your GA data. At minimum I recommend:
- Email Address
- utm_source
- utm_medium
- utm_campaign
- utm_content
- utm_term
- Captured Date
- Landing Page URL (optional but very useful)
The Email Address field is critical. This is how Eloqua ties each custom object record back to the correct contact.
Step 3 - Configure the link to the contact
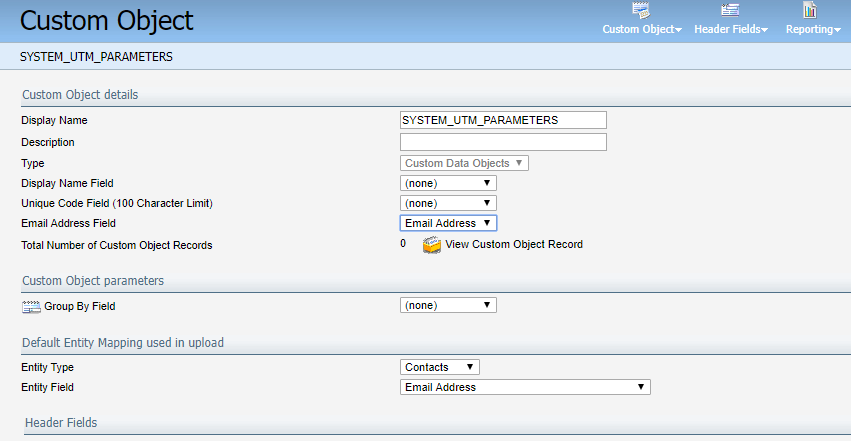
With the fields created, open the Custom Object Settings.
Set the Contact linkage field to Email Address. This tells Eloqua to match custom object records to contacts based on their email.
Leave the Unique Code Field set to (none).
This is important. If you select a Unique Code Field, Eloqua will try to update existing records instead of creating new ones. For Google Analytics data you almost always want a new record created for each form submission so that no history is overwritten.
Step 4 - Map form values into the GA Custom Object
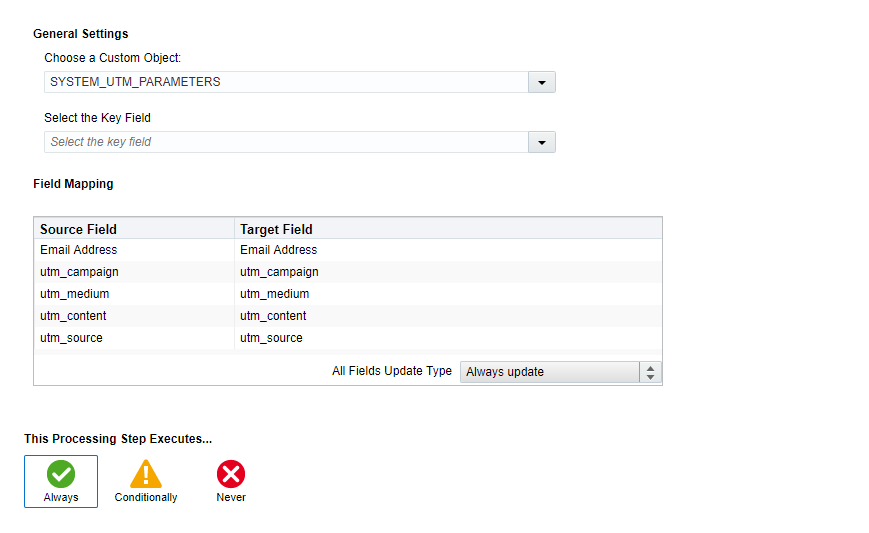
Now we connect your campaign forms to the new Custom Object. Open your form and add a processing step:
Update Custom Object - With Form Values
Select your Google Analytics Data custom object and map:
- Form Email Address → CDO Email Address
- Form utm_source → CDO utm_source
- Form utm_medium → CDO utm_medium
- Form utm_campaign → CDO utm_campaign
- Form utm_content → CDO utm_content
- Form utm_term → CDO utm_term
Leave Select Key Field blank so that Eloqua generates a new custom object record for each submission.
Step 5 - Turning GA data into real attribution insight
Once the data is flowing you will quickly build up a history of GA touchpoints for each contact. You can now:
- identify first touch and last touch campaigns
- build segments based on acquisition source or medium
- join CDO data to CRM opportunities for revenue attribution
- analyse campaign performance by channel and content
- export the data into BI tools for advanced modelling
Because each form submission creates a new custom object record you get a reliable log of how contacts move through your campaigns over time. You are no longer guessing which campaign deserves credit.
Testing checklist
- Submit a test form with a URL that includes UTM parameters.
- Confirm that the form hidden fields are populated correctly.
- Check the form submission data in Eloqua.
- Open the Google Analytics custom object and verify that a new record has been created and linked to your test contact.
- Repeat using a second campaign to confirm that multiple records are created for the same contact.
Conclusion
You now have a complete pattern for making Google Analytics data usable inside Eloqua. Rather than a single fragile field on the contact record, you have a proper attribution log built on Custom Objects that can support serious reporting and analysis.
Across this four part series you have:
- designed a clean UTM framework
- automatically tagged every Eloqua email
- captured GA data through landing pages and forms
- stored UTM values inside Eloqua using a dedicated custom object
Your analytics team gets clean and consistent data. Your sales and marketing teams get a truthful view of which campaigns actually drive revenue.
If you want help wiring this approach into your own Eloqua instance or cleaning up an existing setup, I am always happy to take a look.
Need help building real Eloqua attribution
I work with organisations that want reliable, defensible tracking across Eloqua, Google Analytics and CRM. If you are planning an integration or need to fix what you already have, I can help you get there faster.